
In the old days, web applications were treated as one. There was no separation between frontend and backend apps — at least not like today. The reason was that back then, computers were not as powerful as they are today. Browsers used to rely on servers to render the frontend and return it as simple HTML. This technique is called server-side rendering. These kinds of mindsets are what gave rise to frameworks like ASP.NET Web Forms.
But as innovations in computing increased rapidly, modern computers became much more powerful than they used to be. This has allowed them to render more client-side code.
Thus, modern apps tend to benefit from this by implementing client-side rendering. I’m sure you have heard of JavaScript frameworks like React and Vue. The complexity of these apps usually makes the separation of frontend and backend applications more reasonable.
The separation of concerns makes synchronization between apps more difficult. Security concerns also arise because of the nature of JavaScript frameworks — they run on the client’s machine.
In this article, I am going to provide a walkthrough of how we can implement authentication for your frontend apps with a .NET Core backend using cookies.
Configuring the Frontend
Before we configure our backend, we need to configure our frontend. Why? Separate frontend and backend apps will have some sort of cross-origin resource sharing (CORS) policy.
The HTTP request
So, by configuring our frontend first, we then only allow the parameters that we need.
fetch('https://apiendpoint.com/login', {
    method: 'GET',
    credentials: 'include',
    headers: {
      'Accept': 'application/json',
      'Content-Type': 'application/json',
      'Authorization': 'Basic ' + btoa(inst.user.email + ':' + inst.user.password)
    }
  })
  .then(
    function(response) {
      if (response.status !== 200) {
        console.log('Looks like there was a problem. Status Code: ' +
          response.status);
        return;
      }
    }
  )
  .catch(function(err) {
    console.log('Fetch Error :-S', err);
  });
Let’s take this code snippet as an example. If we use this request, we will need to allow all three Accept, Content-Type, and Authorization headers. Also, if we use HTTP methods like GET,POST, PATCH, and DELETE, we will need to allow those methods as well. Additionally, if we want to use one of the aforementioned HTTP methods, we will also need to allow OPTIONS too. Before each request, the browser sends an OPTIONS request.
Receiving cookies in the frontend
Notice this line within the code snippet:
credentials: 'true'
This line is crucial when we want to allow set-cookies in our frontend apps. For apps using the new fetch API, add credentials: 'include' in the request to enable cookies. For Axios users, use axios.defaults.withCredentials = true; before you initiate a new Axios client.

Configuring the Backend
The backend is where the magic happens. Well, sort of.
You see, when handling CORS, you will always need to allow it from the backend. Requests from the frontend only define what we need from the backend, whilst the security is determined by our backend policies.
You can either configure the CORS policies from the backend app or configure them in your server configs. It seems that configurations on both sides can cause issues.
Defining CORS policies
As mentioned in the previous section, you need to define allowed methods, headers, and origins.
services.AddCors(options =>
  options.AddPolicy("Dev", builder =>
  {
    // Allow multiple methods
    builder.WithMethods("GET", "POST", "PATCH", "DELETE", "OPTIONS")
      .WithHeaders(
        HeaderNames.Accept,
        HeaderNames.ContentType,
        HeaderNames.Authorization)
      .AllowCredentials()
      .SetIsOriginAllowed(origin =>
      {
        if (string.IsNullOrWhiteSpace(origin)) return false;
        // Only add this to allow testing with localhost, remove this line in production!
        if (origin.ToLower().StartsWith("http://localhost")) return true;
        // Insert your production domain here.
        if (origin.ToLower().StartsWith("https://dev.mydomain.com")) return true;
        return false;
      });
  })
);
The policy builder allows us to fluently add methods that will be allowed through CORS. In the example above, we allowed GET, POST, PATCH, DELETE, and OPTIONS methods for HTTP requests. Additionally, we allow all three Accept, Content-Type, and Authorization headers.
To successfully pass cookies through the APIs, we need to allow credentials with AllowCredentials. If we allow credentials, we need to define the allowed origins in the backend as well. Thus, we can either use WithOrigin or SetIsOriginAllowed. Both methods would work because they seem to have the same goal.
Most CORS implementations would use withOrigin and end up setting a wildcard (i.e. *) as the origin. This would work for some cases that do not implement credentials, but the best practice is to define which origins to allow. To achieve this, I chose to use the SetIsOriginAllowed method instead.
After implementing a dependency injection, you can implement the CORS policy by calling the policy name from the IApplicationBuilder.
// Use our CORS policy we defined earlier.
app.UseCors("Dev");
Adding cookie authentication through dependency injection
First, you need to determine your cookie configurations in the Startup.cs file.
services.AddAuthentication(CookieAuthenticationDefaults.AuthenticationScheme)
  .AddCookie(CookieAuthenticationDefaults.AuthenticationScheme, options =>
  {
      options.Cookie.Name = "UserLoginCookie";
      options.SlidingExpiration = true;
      options.ExpireTimeSpan = new TimeSpan(1, 0, 0); // Expires in 1 hour
      options.Events.OnRedirectToLogin = (context) =>
      {
          context.Response.StatusCode = StatusCodes.Status401Unauthorized;
          return Task.CompletedTask;
      };

      options.Cookie.HttpOnly = true;
      // Only use this when the sites are on different domains
      options.Cookie.SameSite = Microsoft.AspNetCore.Http.SameSiteMode.None;
  });
AddAuthentication extends the IServiceCollection configuration. It’s how we inject the cookie authentication scheme. After we add our authentication scheme using cookies, we will need to define the cookie. The AddCookie method does this.
We define our cookie name by using the Cookie.Name parameter and we define when our cookie will expire by defining the ExpireTimeSpan (in our case, the cookie will expire in an hour). The SlidingExpiration will make your cookies last longer by refreshing the expiration time when it comes close.
Securing the cookie configurations
To use secure cookies, using the HttpOnly cookie option is key. Essentially, it protects our cookies from being retrieved by malicious XSS scripts. You should definitely implement it.
The next thing you should implement is the SameSite option. If your app has the same origin, you will most likely set SameSite to the Strict option. Otherwise, if you are using a cross-site cookie, you might want to set the SameSite option to None. You might think, “How does this make my app secure?” Well, it doesn’t. It will only allow your .NET Core app to authenticate cookies from other domains.
But to protect from unwanted uses of your cookie, modern browsers will require you to add a Secure policy on your cookies. You can implement this by extending the IApplicationBuilder:
// Tells the app to transmit the cookie through HTTPS only.
app.UseCookiePolicy(
    new CookiePolicyOptions
    {
        Secure = CookieSecurePolicy.Always
    });
But what does Secure mean? It will check if the cookie is transmitted through HTTPS and only accept cookies from HTTPS. This is only forced when you want to set SameSite to None. That’s why, in local environments, I usually comment out both the SameSite and Secure policy.
Using the cookie authentication middleware
To make the development process more seamless, implement UseAuthentication and UseAuthorization middleware in IApplicationBuilder.
// You need both of these for authorization using cookies.
app.UseAuthentication();
app.UseAuthorization();
Implementing Cookie Authentication on Methods
I will give you an example of how I wrote an implementation for login and logout methods.
using Microsoft.AspNetCore.Authentication;
using Microsoft.AspNetCore.Authentication.Cookies;
using Microsoft.AspNetCore.Authorization;
using Microsoft.AspNetCore.Http;
using Microsoft.AspNetCore.Mvc;
using System;
using System.Linq;
using System.Text;

namespace Example.Controller
{
  [ApiController]
  [Route("auth")]
  public class UserService : ControllerBase
  {
    [HttpGet]
    [Route("login")]
    [Produces("application/json")]
    public IActionResult Login([FromHeader(Name = "Authorization")] string authHeader)
    {
      try
      {
        // Get credentials
        string encodedEmailPassword = authHeader.Substring("Basic ".Length).Trim();
        string emailPassword = Encoding
        .GetEncoding("iso-8859-1")
        .GetString(Convert.FromBase64String(encodedEmailPassword));

        // Get email and password
        int seperatorIndex = emailPassword.IndexOf(':');
        string email = emailPassword.Substring(0, seperatorIndex);
        string password = emailPassword.Substring(seperatorIndex + 1);

        var context = new UserContext();
        var users = context.User.Where(x => x.Email == email).ToList();
        if ((users.Count > 0) && (BCryptPasswordHasher.VerifyHashedPassword(users.FirstOrDefault().Password, password)))
        {
          var claims = new Claim[]
          {
            new Claim("ID", users.FirstOrDefault().UserID.ToString()),
            new Claim("Name", users.FirstOrDefault().Name.ToString())
          };

          var claimsIdentity = new ClaimsIdentity(
          claims, CookieAuthenticationDefaults.AuthenticationScheme);

          HttpContext.SignInAsync(
          CookieAuthenticationDefaults.AuthenticationScheme,
          new ClaimsPrincipal(claimsIdentity)).Wait();

          return Ok();
        }

        return new UnauthorizedResult();
      }
      catch (Exception ex)
      {
        return StatusCode(500);
      }
    }

    [HttpGet]
    [Route("logout")]
    [Produces("application/json")]
    [Authorize(AuthenticationSchemes = CookieAuthenticationDefaults.AuthenticationScheme)]
    public IActionResult Logout()
    {
      try
      {
        HttpContext.SignOutAsync(CookieAuthenticationDefaults.AuthenticationScheme).Wait();
        return Ok();
      }
      catch (Exception ex)
      {
        return StatusCode(500);
      }
    }
  }
}
You get the authentication cookie by calling SignInAsync on the HttpContext. This will set the cookie on the HTTP request when it is returned. To use authentication methods on the cookies, we need to use the Authorize attribute on the method. This will activate the UseAuthentication and UseAuthorization middleware.
To destroy the cookie, simply call SignOutAsync on the HttpContext. The cookie will then expire and cease to be usable in all sessions.
Real-Life Example
I have implemented my solution, and to show you how it works, I have attached a few screenshots. I hope this can help you understand what happens when all is implemented correctly.
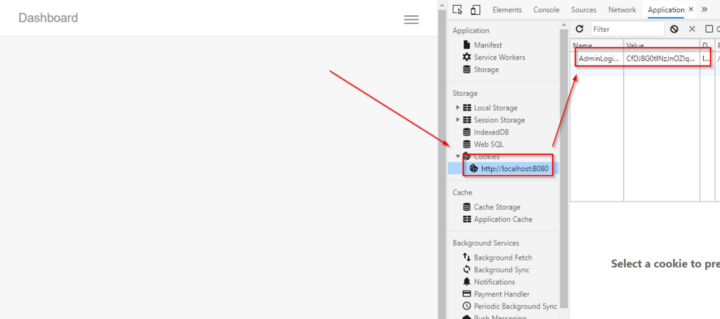
Here is an example of what happens when the cookie setup works. The cookie will be saved and it can be checked inside the “Application” tab in Chrome Dev Tools.
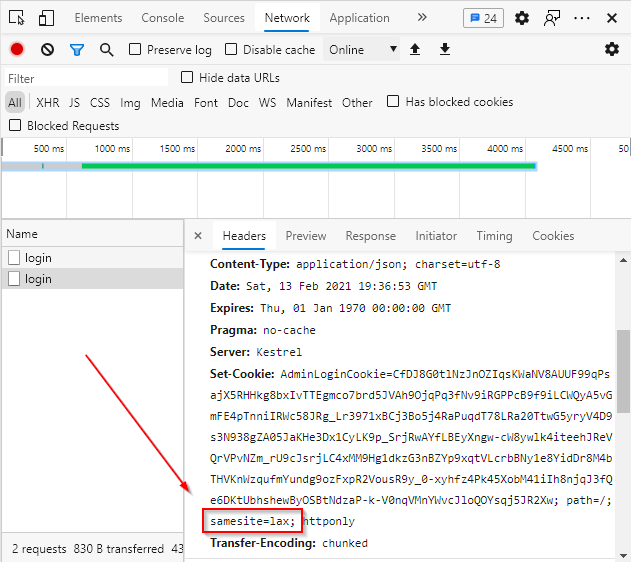
Notice that the SameSite attribute inside the cookie is lax. This is because I tested this in a localhost environment. Therefore, I cannot set SameSite to None because it must be transported through HTTPS.
Conversely, if I were to implement HTTPS, the expected result would be as follows:
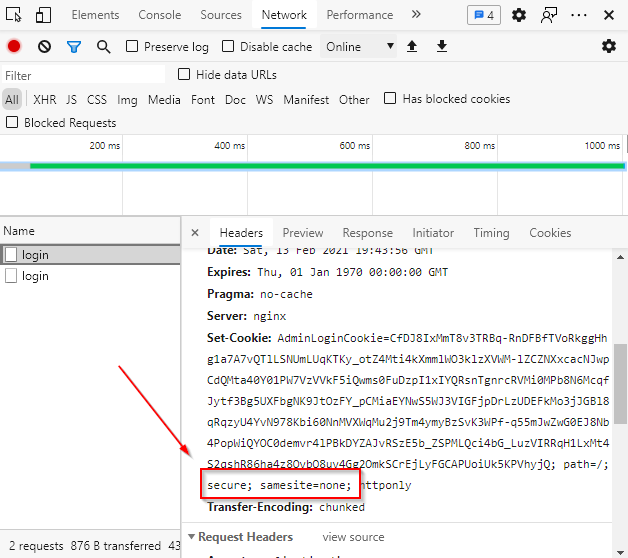
This is an example of what my production environment cookies are. Notice the Secure attribute and how the SameSite attribute is set to None. The logout request should have this response:
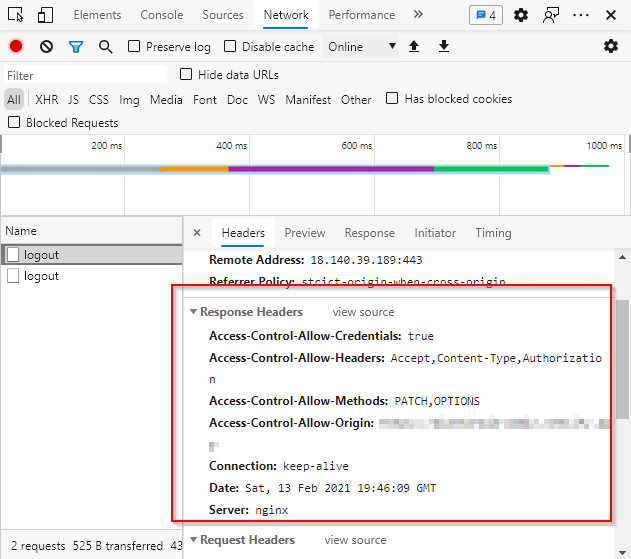
Expect the set-cookie header to be empty, only returning a plain response.
Conclusion
That is how you use cookies in your frontend apps. Keep in mind that the session is not distributed, and if you have multiple servers, you need to implement distributed sessions. The most common one is a Redis session.
An implementation of CORS is complicated, but there’s much to learn from it. I hope this article helps you set up CORS for your .NET Core app.

