
In this article, I will first briefly describe the minimal APIs feature in .NET 6. To further demonstrate its use case, I will show you how to create a URL Shortener web app and containerize it using Docker step by step. The following screen recording demonstrates the app.
Minimal APIs
To try out a minimal API, we can create an empty web app using the following command.
dotnet new web
This command creates a web project with just a single Program.cs file, which has the following content.
using System;
using Microsoft.AspNetCore.Builder;
using Microsoft.Extensions.Hosting;

var builder = WebApplication.CreateBuilder(args);
await using var app = builder.Build();

if (app.Environment.IsDevelopment())
{
    app.UseDeveloperExceptionPage();
}

app.MapGet("/", (Func<string>)(() => "Hello World!"));
await app.RunAsync();
The Program.cs file is written in the style of top-level program, which gets rid of the class Program wrapper and the Main() method thus decreases code clutters. In the code above, the first few lines create a web host, then line 13 defines a route in the routing table using the MapGet method. Following the pattern, we can continue to build more APIs using MapGet, MapPost, and similar methods.
This new API composition is quite different from the traditional API Controller or MVC style. The minimal APIs have really pushed the number of lines of code to an extreme. If our APIs are simply doing some non-essential computation or CRUD operations, then the minimal APIs can greatly reduce overhead.
If we run the app, we will see the string “Hello World!” on the homepage. That’s it! With only a few lines of code, we now have a fully functioning HTTP API. Next, let’s build an app with some meat in it.

URL Shortener
For demo purposes, we will create a URL Shortener web app. The app provides a front-end interface so that when a user submits a URL, its shortened version will be displayed in the web page. On the backend, the app persists an entry with the original URL and its shortened version in a database. Therefore, the app is able to redirect a shortened URL to its original address.
The following screen recording demonstrates the features of this small app.

1. Creating an API to Shorten a URL
In this app, we are going to store the map entries between shortened and original URLs in a local database. A NoSQL database is suitable for this scenario since this app doesn’t have complex data relationships. You can use LiteDB. If you haven’t heard about it, LiteDB is a small, fast and lightweight .NET NoSQL embedded database, and we can think LiteDB as a combination of SQLite and MongoDB.
After installing the LiteDB NuGet package, we can register the ILiteDatabase in the Dependency Injection (DI) container as follows.
var builder = WebApplication.CreateBuilder(args);
builder.Services.AddSingleton<ILiteDatabase, LiteDatabase>(_ => new LiteDatabase("short-links.db"));
await using var app = builder.Build();
Then we can create a POST API endpoint which accepts a request body with a URL and returns a JSON object contains the shortened URL. An example implementation is as follows.
app.MapPost("/url", ShortenerDelegate);

static async Task ShortenerDelegate(HttpContext httpContext)
{
    var request = await httpContext.Request.ReadFromJsonAsync<UrlDto>();
    if (!Uri.TryCreate(request.Url, UriKind.Absolute, out var inputUri))
    {
        httpContext.Response.StatusCode = StatusCodes.Status400BadRequest;
        await httpContext.Response.WriteAsync("URL is invalid.");
        return;
    }

    var liteDb = httpContext.RequestServices.GetRequiredService<ILiteDatabase>();
    var links = liteDb.GetCollection<ShortUrl>(BsonAutoId.Int32);
    var entry = new ShortUrl(inputUri);
    links.Insert(entry);
    var result = $"{httpContext.Request.Scheme}://{httpContext.Request.Host}/{entry.UrlChunk}";
    await httpContext.Response.WriteAsJsonAsync(new { url = result });
}

public class UrlDto
{
    public string Url { get; set; }
}

public class ShortUrl
{
    public int Id { get; protected set; }
    public string Url { get; protected set; }
    public string UrlChunk => WebEncoders.Base64UrlEncode(BitConverter.GetBytes(Id));

    public ShortUrl(Uri url)
    {
        Url = url.ToString();
    }
}
In the code above, line 1 defines the route /url for the POST API endpoint, and hooks it up with a request delegate ShortenerDelegate to handle HTTP requests. Inside the ShortenerDelegate method, we first parse the request body to get the URL and validate its format. Then we resolve the ILiteDatabase service from the DI container, and insert an entry into the database. In the end, the delegate method returns the shortened URL as a JSON object.
We model the short URLs as a class ShortUrl, where the Url property represents the original URL and the Id property is auto generated when inserting into the NoSQL database. The Id property ensures the uniqueness of each URL in the local database. In order to generate a short URL chunk, we use the WebEncoders.Base64UrlEncode() method to convert the Id, an integer, to the UrlChunk, a string.
For example, when Id = 1, the UrlChunk is AQAAAA; when Id = 2, the UrlChunk is AgAAAA; and so on. In the next section, we will convert the UrlChunk back to the Id to get its original Url from the local database.
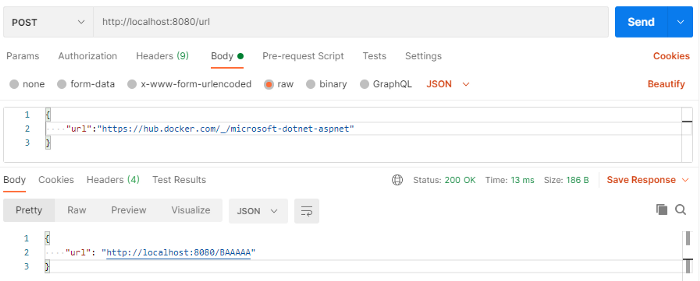
With that, we now have an API endpoint which accepts HTTP POST requests with a JSON body containing a URL string, and returns a JSON object containing a shortened URL string. We can test the API endpoint using Postman.
2. Creating an API to Redirect URLs
Now we are going to support another feature for redirecting short URLs to their original URLs. This API has to cover lots of input variations, thus the easiest way to catch all URLs is to use the MapFallback() method. Also note that we should place this method after all other routes so that requests to those deterministic routes could find their matches first from the route table.
app.MapFallback(RedirectDelegate);

static async Task RedirectDelegate(HttpContext httpContext)
{
    var db = httpContext.RequestServices.GetRequiredService<ILiteDatabase>();
    var collection = db.GetCollection<ShortUrl>();

    var path = httpContext.Request.Path.ToUriComponent().Trim('/');
    var id = BitConverter.ToInt32(WebEncoders.Base64UrlDecode(path));
    var entry = collection.Find(p => p.Id == id).FirstOrDefault();

    httpContext.Response.Redirect(entry?.Url ?? "/");
    await Task.CompletedTask;
}
The fallback route is hooked to a RedirectDelegate. In this delegate method, we first resolve the ILiteDatabase from the DI container and then search the short URL from the database. If found, then the API redirects the page to its original URL. Otherwise, the API redirects the page to the app’s homepage.
3. Creating an API to Serve a Static HTML Page
For this app, we only need a simple HTML page to allow end users to send HTTP requests using an input field and a button. Thus we are going to create an index.html file and implement the user interface there. The web page looks like the following screenshot.
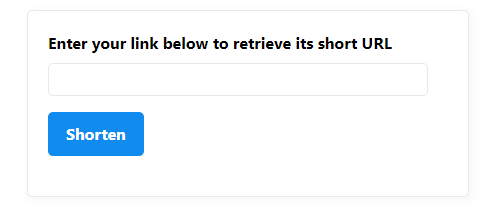
Note that the index.html file needs to be included in this project so that it is copied to the output folder.
Once the index.html file is ready, we can register the route as follows.
app.MapGet("/", ctx =>
                {
                    ctx.Response.ContentType = "text/html";
                    return ctx.Response.SendFileAsync("index.html");
                });
Now we have completed this web application. All the code is in one single file. You can test it out if you have the latest .NET 6 preview version installed. Or we can try out the application using Docker.
4. Containerizing Our App
Docker allows us to containerize our applications thus easy to deploy, maintain, and scale. I have prepared a Dockerfile for this app.
ARG VERSION=6.0-alpine

FROM mcr.microsoft.com/dotnet/sdk:$VERSION AS build
WORKDIR /app

COPY ./src/*.csproj ./
RUN dotnet restore

COPY ./src/*.* .

RUN dotnet publish -c Release -o /out --no-restore


FROM mcr.microsoft.com/dotnet/aspnet:$VERSION AS runtime
WORKDIR /app
COPY --from=build /out ./
ENTRYPOINT ["dotnet", "UrlShortener.dll"]
We then can build a docker image using the following command.
docker build -t url-shortener-net6 .
Then we can run the app in a container using the following command.
docker run -it --rm -p 8080:80 url-shortener-net6
Once the container is running, we can open a browser and visit http://localhost:8080 to play with our app.
That’s all for today. Thanks for reading.

