
This post is about using Automapper in ASP.NET Core project. AutoMapper is an object-object mapper which allows you to solve the problem of manually mapping each property of a class with the same properties of another class. Before AutoMapper, if you want to map properties of one object to another, you have manually assign each of the property objects, it will hard and error-prone if an object got lot of properties. If you are a MVC developer most of the time you manually map model objects with viewmodel objects. AutoMapper helps to do it in clean and readable way. For using AutoMapper, first you need to set the mapping classes in AutoMapper, you can use CreateMap method for this. To for map classes, you can use Map method.
So in ASP.NET Core, first you need to include AutoMapper in the project.json file as a dependency. Once you did that run dotnet restore to download AutoMapper. Once AutoMapper added to the project, you need to configure the mapping. You can do it using either in Startup class, ConfigureServices() method. Or you can create a profile class, where you can add all the mappings and use it in Startup class, ConfigureServices() method. In this post I am mapping User and UserViewModel class. Here is the Model and ViewModel classes.
public class User
{
    [Key]
    public int Id { get; set; }
    public string Name { get; set; }
    public string Email { get; set; }
    public string Password { get; set; }
    public DateTime CreatedOn { get; set; } = DateTime.UtcNow;
}

public class UserViewModel
{
    [Required]
    public string Name { get; set; }
    [Required, DataType(DataType.EmailAddress)]
    public string Email { get; set; }
    [Required, DataType(DataType.Password)]
    public string Password { get; set; }
    [Required, DataType(DataType.Password), Compare("Password")]
    public string ConfirmPassword { get; set; }
    [Required]
    public bool AgreedToTerms { get; set; }
}
And here is the code in ConfigureServices method.
var config = new AutoMapper.MapperConfiguration(cfg =>
{
    cfg.CreateMap<UserViewModel, User>();
});

var mapper = config.CreateMapper();
You can map the classes using Map method of Mapper object. To use Mapper object in controllers, you can inject it using ASP.NET Core dependency injection.
private readonly IMapper _mapper;
public HomeController(IMapper mapper)
{
_mapper = mapper;
}
public IActionResult Index(UserViewModel uservm)
{
if (ModelState.IsValid)
{
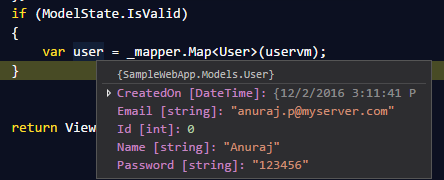
var user = _mapper.Map<User>(uservm);
}
return View();
}This is the screenshot of mapping using Automapper.
Here is the profile class implementation, which quite similar to current implementation except all the mappings will be inside this class.
public class AutoMapperProfileConfiguration : Profile
{
    public AutoMapperProfileConfiguration()
    : this("MyProfile")
    {
    }
    protected AutoMapperProfileConfiguration(string profileName)
    : base(profileName)
    {
        CreateMap<UserViewModel, User>();
    }
}
And you can use it like this in the Startup class.
public void ConfigureServices(IServiceCollection services)
{
    var config = new AutoMapper.MapperConfiguration(cfg =>
    {
        cfg.AddProfile(new AutoMapperProfileConfiguration());
    });

    var mapper = config.CreateMapper();
    services.AddSingleton(mapper);
    services.AddMvc();
}
And you need to use Automapper package in project.json as dependency.
Happy Programming 🙂

